Friday, May 28, 2010

Exception/Error Handling and Logging

How difficult it is to implement a good logging and error handling in your web application. Sometimes it’s hard to decide on which is the best way to implement error handling in the application. In this article I have throw light on one of third party component (dll) which provides you lots of good feature and makes error handling easy to implement.

I am talking about Log4Net dll, which is free to download and plug into your application.
Lets look into step by step implementation.


1) Create your website application or you can use your any existing site. Download the DLL file from Apache web site (http://logging.apache.org/log4net/download.html) After downloading extract the file. Now, you need to add Log4net DLL reference to your web site, right click in your application and choose add reference...


2) Now let's configure our application by adding some tags to web.config file: Inside <configSections> tag, add this tag:
<section name="log4net" type="log4net.Config.Log4NetConfigurationSectionHandler, log4net" />
And also add log4net tag below </configSections> i.e.
<log4net>
<appender name="RollingFile" type="log4net.Appender.RollingFileAppender">
<file value="C:\Temp\Log"/> <!-- path + file name -->
<staticLogFileName value="false"/>
<appendToFile value="true" />
<rollingStyle value="Date" />
<datePattern value="_yyyy_MM_dd".html"" /> <!-- suffix of filename & extention -->
<layout type="log4net.Layout.PatternLayout">
<conversionPattern value="%m" />
</layout>
</appender>
<!-- Add below appender only if you want to sent error mail too -->
<appender name="SmtpAppender" type="StoreManager.Utilities.EmailService"><!—- namespace of wrapper class -->
<to value="abc@xyz.com,efg@xyz.com" />
<from value="StoreManager@xyz.com" />
<subject value="Unhandled Exception: Store Manager" />
<smtpHost value="smtpHostName"/>
<lossy value="false"/>
<evaluator type="log4net.Core.LevelEvaluator">
<threshold value="ERROR"/>
</evaluator>
<layout type="log4net.Layout.PatternLayout">
<conversionPattern value="%m" />
</layout>
</appender>
<root>
<level value="DEBUG" />
<appender-ref ref="RollingFile" />
<appender-ref ref="SmtpAppender" />
</root>
</log4net>


3) Create a Enum for log level

namespace StoreManager.DataModels
{
public class Constants
{
public enum LogLevel
{
DEBUG = 1,
ERROR,
FATAL,
INFO,
WARN
}
}
}


4) Create a logger class

using System;
using log4net;
using log4net.Config;
using System.Web;
using System.Text;
using System.Diagnostics;

namespace StoreManager.Utilities
{
public static class Logger
{
#region Members
private static readonly ILog logger = LogManager.GetLogger(typeof(Logger));
#endregion

#region Constructors
static Logger()
{
XmlConfigurator.Configure();
}
#endregion

#region Methods
public static void WriteLog(Constants.LogLevel logLevel, String log)
{
switch (logLevel)
{
case Constants.LogLevel.DEBUG:
default:
logger.Debug(log);
break;
case Constants.LogLevel.ERROR:
logger.Error(log);
break;
case Constants.LogLevel.FATAL:
logger.Fatal(log);
break;
case Constants.LogLevel.INFO:
logger.Info(log);
break;
case Constants.LogLevel.WARN:
logger.Warn(log);
break;
}
}

public static string GenerateLogInfo(Exception ex)
{
StringBuilder sbBody = new StringBuilder();
string sURL = HttpContext.Current.Request.Url.ToString();
if (sURL.IndexOf("error.aspx") < 0)
{
string Stack = "";
StackTrace Trace = new StackTrace();
int FrameCount = Trace.FrameCount;
// We skip frame 1 on the stack since that is always the current method //
for (int index = 1; index < FrameCount; index++)
{
if (index > 1)
{
Stack += " --> ";
}
Stack += Trace.GetFrame(index).GetMethod().ToString();
}
Stack = (Stack != "" ? Stack : ex.StackTrace);
Stack = (ex.InnerException != null ? ex.InnerException.StackTrace + "\n" : "") + Stack;
if (Stack == "")
{
Stack = "Stack trace not available.";
}
string exceptionMessage = ex.InnerException != null ? ex.InnerException.Message : ex.Message;
sbBody.Append("<br><table border='1'><tr><td>Time: " + System.DateTime.Now.ToString() + "</tr></td>");
sbBody.Append("<tr><td>URL: " + HttpContext.Current.Request.Url + "</tr></td>");
sbBody.Append("<tr><td>User IP: " + HttpContext.Current.Request.UserHostAddress + "</tr></td>");
sbBody.Append("<tr><td>Error Message: " + exceptionMessage + "</tr></td>");
sbBody.Append("<tr><td>Stack: \n" + Stack.Replace(" ", " ") + "</tr></td></table>");
}
return sbBody.ToString();
}
#endregion
}
}


5) Smtp appender wrapper – Use this class if required

using System;
using System.Collections.Generic;
using System.Linq;
using System.Web;
using log4net.Appender;
using System.Net;
using System.Net.Mail;

namespace StoreManager.Utilities
{
/// <summary>Sends an HTML email when logging event occurs</summary>
public class EmailService : SmtpAppender
{
/// <summary>Sends an email message</summary>
protected override void SendEmail(string body)
{
SmtpClient smtpClient = new SmtpClient();
MailMessage mailMessage = new MailMessage();
mailMessage.From = new MailAddress(From);
mailMessage.To.Add(To);
mailMessage.Subject = Subject;
mailMessage.Body = body;
mailMessage.Priority = Priority;
mailMessage.IsBodyHtml = true;

smtpClient.Host = SmtpHost;
smtpClient.Send(mailMessage);
}
}

}


6) Add below code in Global.asax.cs for global error handling.

protected void Application_Error(object sender, EventArgs e)
{
Exception exception = Server.GetLastError();
HttpException httpException = exception as HttpException;
Response.Clear();

if (httpException != null)
{
Logger.WriteLog(Constants.LogLevel.ERROR, Logger.GenerateLogInfo(exception));
Server.ClearError();
Response.Redirect("~/error.aspx");
}

}

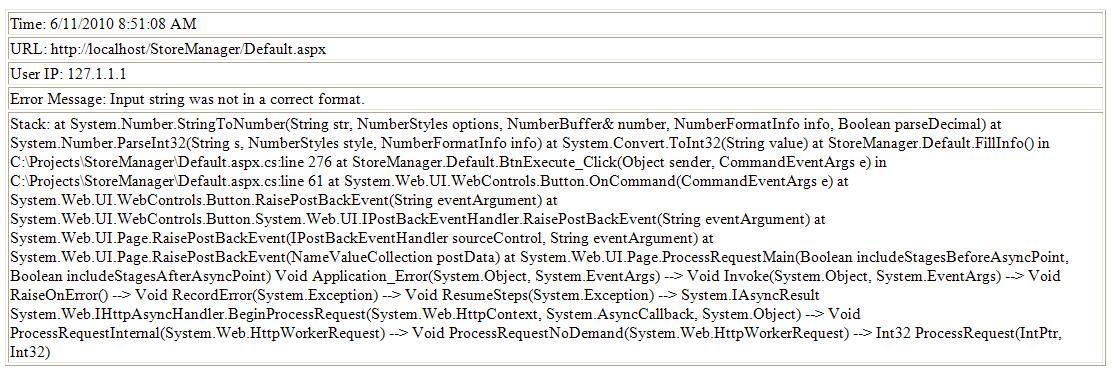
Now we are done with all and this will generate day wise log of errors in html, and also same log will be mailed to listed persons in html format.

This will generate email and log somewhat as below:
Thursday, May 27, 2010

Convert a column with comma saperated row/string in sql

Here we go, to convert a column into row or string separated by a delimiter, we can use coalesce. Just create below function and call it for your SP. Avoid where condition and parameter if not required.

create FUNCTION ConvertColumnToRow (@id int)
RETURNS varchar(100)
AS
BEGIN
DECLARE @List varchar(100)
SELECT @List = COALESCE(@List + ', ', '') + CAST(Name AS varchar(10))
FROM Employee
WHERE ID = @id
RETURN(@list)
END;
go

CSS based lightbox takes seconds to implement

If you want to implement lightbox in short time with less effort and compatible with FF and IE here you go. Copy-paste below html in your page replaces the content and you are done.

<html xmlns="http://www.w3.org/1999/xhtml">
<head>
<title>Untitled Page</title>
<style type="text/css">
.black_overlay{
display: none;
position: fixed;
top: 0%;
left: 0%;
width: 100%;
height: 100%;
background-color: black;
z-index:1001;
-moz-opacity: 0.8;
opacity:.80;
filter: alpha(opacity=80);
}
.white_content {
display: none;
position: absolute;
font-family: Verdana;
top: 25%;
left: 25%;
width: 50%;
height: 50%;
padding: 16px;
border: 16px solid orange;
background-color: white;
z-index:1002;
overflow: auto;
font-size:small;
}
#screenshot {
BORDER-BOTTOM: #ccc 1px solid;
POSITION: absolute;
BORDER-LEFT: #ccc 1px solid;
PADDING-BOTTOM: 5px;
PADDING-LEFT: 5px;
PADDING-RIGHT: 5px;
DISPLAY: none;
BACKGROUND: #333;
COLOR: #fff;
BORDER-TOP: #ccc 1px solid;
BORDER-RIGHT: #ccc 1px solid;
PADDING-TOP: 5px
}
</style>
</head>
<body>
<div>
this is body content

<input type="button" value="Click here to load lightbox" onclick="document.getElementById('light').style.display='block';document.getElementById('fade').style.display='block'" />
</div>
<div id="light" class="white_content">
<a href="javascript:void(0)" onclick="document.getElementById('light').style.display='none';document.getElementById('fade').style.display='none'">
Close</a><br />
<br />
<br />
<div id="container" runat="server">
Put your lightbox content over here
</div>
</div>
<div id="fade" runat="server" class="black_overlay">
</div>
</body>
</html>

This will look something like below:

Global, Generic & Custom JQuery tooltip

Using script and styling generate custom tooltip.

Code:

<html>
<head>
<title>jQuery Tooltip</title>
<style type="text/css">
body { font-family: verdana, arial, sans-serif; font-size: 0.8em; background-color: black; color: white; }
a { color: white; } #example a:hover { text-decoration: none; }
span.show-tooltip-text { display: none; position: absolute; font-size: 0.9em; background-image: url(bg.gif); background-repeat: repeat-x; padding: 6px; padding-left: 12px; padding-right: 12px; color: white; }
</style>
<script language="JavaScript" src="JQuery.js"></script>
<script language="JavaScript">
ShowTooltip = function(e)
{
var text = $(this).next('.show-tooltip-text');
if (text.attr('class') != 'show-tooltip-text')
return false;

text.fadeIn()
.css('top', e.pageY)
.css('left', e.pageX+10);

return false;
}
HideTooltip = function(e)
{
var text = $(this).next('.show-tooltip-text');
if (text.attr('class') != 'show-tooltip-text')
return false;

text.fadeOut();
}

SetupTooltips = function()
{
$('.show-tooltip')
.each(function(){
$(this)
.after($('<span/>')
.attr('class', 'show-tooltip-text')
.html($(this).attr('title')))
.attr('title', '');
})
.hover(ShowTooltip, HideTooltip);
}

$(document).ready(function() {
SetupTooltips();
});
</script>
</head>
<body>
<input type="submit" value="Example Button" class="show-tooltip" title="<strong>HTML</strong> works as normal inside the tooltip.<br/>Multi-line tooltips look and function perfectly fine, as well!"/>
</body>
</html>

This will end up something like below:

User stories and Sprint planning

User Stories are stories that we jot down during discussion with customers / clients. This will give us a brief idea about the requirement. If you are working with the company who deals with internal products then Product owners will become your customer/ clients. Have a look at Description field in below image to find out some of the basic examples of user stories.


Sprint planning is the task to play with all user stories and make them a well order list. Pre-requisition to start sprint planning is to have your whole team with you in the meeting and your product / project owner’s has clear idea of user stories. Once you have rough list of all user stories, scrum master can initiate with making them perfect order list. One has to take one by one all user sorties and have to discuss them with the team to fill all columns in the sprint planning doc.

Normally there are different patterns to design the doc, but you have to pick one standard format. Please refer image for example. Almost all columns in the image are self explanatory still I would like to explain few.

1) Description – User stories
2) Initial estimate – Depending on complexity and time needed you can rank this column in 1 to 13, in which 13 being highest.
3) Adjusted estimate – After planning if you felt that estimates needs to be updated then put re-estimate in this column.
4) Adjustment factor - Adjusted estimate – initial estimate / initial estimate
5) Value – This will be given by product / project owner / clients i.e. High, Medium or Low

To sum up above, points those needs to be consider while creating this doc are estimates, complexity, priority and owner value. If these factors are not enough, one can also consider Uncertainty, dependencies and frequency of use to have more clear idea.

Friday, February 19, 2010

Sprint & Scrum

The Scrum process begins by reviewing a product backlog with the product owner. You identify the highest-priority features and then estimate how many will fit into a sprint. These features then compose the sprint backlog. A sprint is a predefined period of time, usually 2 to 4 weeks, during which the team analyzes, designs, constructs, tests, and documents the selected features.

The team holds a daily status meeting, referred to as the daily Scrum, to review feature status. This meeting has specific guidelines as below:

• The meeting starts sharp on time.

• All are welcome, but only “developers” may speak

• The meeting is “time boxed” to 15 minutes

• The meeting should happen at the same location and same time every day During the meeting, each team member answers three questions:
1. What have you accomplished since our last meeting?
2. What are you planning to do today?
3. Do you have any problems preventing you from accomplishing your goal?
(It is the role of the Scrum Master to facilitate resolution of these impediments. Typically this should occur outside the context of the Daily Scrum so that it may stay under 15 minutes.)

When a sprint is completed, the features are demonstrated to the customer, and the team and the customer decide whether additional work is needed or if the sprint work is approved to be released to a beta or production environment. Each sprint is followed by a retrospective during which the team lists items that went well or poorly;

action plans are documented to keep the successes going and to improve the areas that performed poorly.

Scrum strengths:
Prioritized delivery —Features are delivered in a sequence that ties to business value.
Status transparency —The daily meetings expose the project status.
Team accountability —Everyone signs off on the work that will be pursued during the sprint.
Continuous delivery —Scrum delivers product features (commercial software or web portals) continuously.

Scrum weaknesses:
Scrum doesn’t want specialists. It may be difficult to quickly convert an existing team from a group of specialists to a group where anyone can perform any task.
A Scrum team can’t be successful without a strong ScrumMaster, which makes the process highly dependent on one individual.

Scrum is incredibly popular today—it’s almost become synonymous with the term agile development. Scrum provides a great, repeatable process that is well suited for product development and steady-state release management.

Thursday, February 18, 2010

Agile Principles – 3C 2M2R 2D IST

Customer satisfaction - Our highest priority is to satisfy the customer through early and continuous delivery of valuable software.

Change request - Welcome changing requirements, even late in development. Agile processes harness change for the customer's competitive advantage.

Release cycle - Deliver working software frequently, from a couple of weeks to a couple of months, with a preference to the shorter timescale.

Communication - Business people and developers must work together daily throughout the project.

Resource management - Build projects around motivated individuals. Give them the environment and support they need, and trust them to get the job done.

Discussions/Meetings - The most efficient and effective method of conveying information to and within a development team is face-to-face conversation.

Milestones - Working software is the primary measure of progress.

Maintenance - Agile processes promote sustainable development. The sponsors, developers, and users should be able to maintain a constant pace indefinitely.

Design - Continuous attention to technical excellence and good design enhances agility.

Simplicity - the art of maximizing the amount of work ‘not done is essential’

Teamwork - The best architectures, requirements, and designs emerge from self-organizing teams.

Improvement - At regular intervals, the team reflects on how to become more effective, then tunes and adjusts its behavior accordingly.