Monday, June 6, 2011

Saturday, May 29, 2010

Extreme Programming

Similar to Scrum, XP starts the process by creating a backlog of work to perform during
a sprint/iteration. XP creates the backlog by working with customers and creating
user stories. In parallel with this work, the team performs an architectural spike, during which they experiment with the features to envision the initial architecture. XP
classifies this work as the exploration phase.

The planning phase follows exploration. This phase focuses on identifying the most
critical user stories and estimating when they can be implemented. Tasks are defined
for each feature, to aid with estimating complexity. The team outlines an overall
release schedule, with an understanding that a high level of uncertainty exists until
the work begins. A release will have one to many iterations, which are typically 2- to 4-
week construction windows.
When an iteration begins, the specific plan for the iteration is revisited. The team
adds any new user stories and tasks that have been discovered since the overall release
was outlined.
XP integrates customer testing into the development iteration. The customer is
asked to identify the acceptance tests, and the team works to automate these tests so
they can be run throughout the iteration.

The planning phase is followed by the productionizing phase, during which the code
is certified for release. Certified means the code passes all customer tests plus nonfunctional requirements such as load testing, service-level requirements, and response time requirements. You can see an overview of XP in below image:


XP's characteristics:

• Specific practice —Unlike Scrum, XP is specific about the practices that should be
used during a software project. These practices include pair programming,
TDD, continuous integration, refactoring, and collective code ownership.
• Simplicity —Teams perform the minimum work needed to meet requirements.
• Automation —Unit and functional tests are automated.
• Quality through testing —Features are tested constantly, and developers check
each other’s code via pair programming.

XP’s strengths :

• Customer-focused (it’s all about user stories)
• Quality via frequent testing
• Constant focus on identifying and delivering the critical user stories
• High visibility on project status
• Great support for volatile requirements

XP's weaknesses:

• Need for team maturity —Practices such as pair programming and TDD require
responsible developers, and they aren’t always easy to obtain.
• Dependency on testing —If developers know that significant testing will take place
downstream, they may be less than diligent when they’re creating designs.
• Scalability —XP may not work well for large projects.
• Dependency on team member co-location —The team usually has a team room.


XP supports many of the critical goals of an agile process, such as dealing with volatile
requirements and delivering prioritized, working software as soon as possible. XP also
supports the principle of just enough, keeping with the lean philosophy of minimizing
waste.

XP has sometimes been criticized for its lack of formality in system documentation
and system design. In recent years this has changed, and XP teams now create the documentation needed to support a project’s customers.

Friday, May 28, 2010

Salesforce Web-to-Lead (W2L) implementation

A web-to-Lead forms is an essential component of marketing and sales automation. Its purpose is to capture data submitted by website visitors, such as contact information and product interest, and store it as a “Lead” record in a CRM product, in this case Salesforce.com.

Here in this article I will more talk about coding part of web to lead and not on how to setup your account in salesforce. This help you can get on salesforce site only.

Over here I am assuming that, you or your company already has your personal organization ID and you have also done setup in salesforce for web to lead. Setup will include
creating lead template form too. Once you are having your lead form ready you can use that generated html to post contacts to Salesforce CRM.

But over here the concern is how you can do that programmatically. Let’s check this out step by step.

1) You will be having the salesforce auto generated lead form template, copy html part of it and paste it in your applications lead.aspx page.

2) Style it well and remove org. id and return URL from the html and keep it to config file. Also keep method post of from but remove the action URL and kept that salesforce URL to config too.

3) Add validation as per need.

4) Now once you click submit button your lead.aspx.cs will get executed and in that have a method for form post. i.e.
private void FormPost(NameValueCollection collection)
{
NameValueCollection form = new NameValueCollection();
form.Add("oid", appConfig["OID"]);
for (int count = 0; count < collection.Count; count++)
{
if (collection.Keys[count].ToLower() == "returl")
{
// Update "Return URL" dynamically with 'http://' & servername
form.Add(collection.Keys[count], Request.Url.ToString().Substring(0, Request.Url.ToString().IndexOf(Request.Url.PathAndQuery)) + collection["retURL"]);
}
else
{
form.Add(collection.Keys[count], collection[count]);
}

}
WebClient wc = new WebClient();
// Posts form collection to Salesforce and get the response
byte[] res = wc.UploadValues(appConfig["SFURL"], "POST", form);
// Convert response from byte array to string
string result = System.Text.ASCIIEncoding.UTF8.GetString(res);
Response.Write(result);
}

Call this method on page load and pass Request.Form as param. That’s all you are done. Using this code, if you want to load different type of leads form dynamically then also you can do that, as the method post the form dynamically no hard coded ids are there.

Exception/Error Handling and Logging

How difficult it is to implement a good logging and error handling in your web application. Sometimes it’s hard to decide on which is the best way to implement error handling in the application. In this article I have throw light on one of third party component (dll) which provides you lots of good feature and makes error handling easy to implement.

I am talking about Log4Net dll, which is free to download and plug into your application.
Lets look into step by step implementation.


1) Create your website application or you can use your any existing site. Download the DLL file from Apache web site (http://logging.apache.org/log4net/download.html) After downloading extract the file. Now, you need to add Log4net DLL reference to your web site, right click in your application and choose add reference...


2) Now let's configure our application by adding some tags to web.config file: Inside <configSections> tag, add this tag:
<section name="log4net" type="log4net.Config.Log4NetConfigurationSectionHandler, log4net" />
And also add log4net tag below </configSections> i.e.
<log4net>
<appender name="RollingFile" type="log4net.Appender.RollingFileAppender">
<file value="C:\Temp\Log"/> <!-- path + file name -->
<staticLogFileName value="false"/>
<appendToFile value="true" />
<rollingStyle value="Date" />
<datePattern value="_yyyy_MM_dd".html"" /> <!-- suffix of filename & extention -->
<layout type="log4net.Layout.PatternLayout">
<conversionPattern value="%m" />
</layout>
</appender>
<!-- Add below appender only if you want to sent error mail too -->
<appender name="SmtpAppender" type="StoreManager.Utilities.EmailService"><!—- namespace of wrapper class -->
<to value="abc@xyz.com,efg@xyz.com" />
<from value="StoreManager@xyz.com" />
<subject value="Unhandled Exception: Store Manager" />
<smtpHost value="smtpHostName"/>
<lossy value="false"/>
<evaluator type="log4net.Core.LevelEvaluator">
<threshold value="ERROR"/>
</evaluator>
<layout type="log4net.Layout.PatternLayout">
<conversionPattern value="%m" />
</layout>
</appender>
<root>
<level value="DEBUG" />
<appender-ref ref="RollingFile" />
<appender-ref ref="SmtpAppender" />
</root>
</log4net>


3) Create a Enum for log level

namespace StoreManager.DataModels
{
public class Constants
{
public enum LogLevel
{
DEBUG = 1,
ERROR,
FATAL,
INFO,
WARN
}
}
}


4) Create a logger class

using System;
using log4net;
using log4net.Config;
using System.Web;
using System.Text;
using System.Diagnostics;

namespace StoreManager.Utilities
{
public static class Logger
{
#region Members
private static readonly ILog logger = LogManager.GetLogger(typeof(Logger));
#endregion

#region Constructors
static Logger()
{
XmlConfigurator.Configure();
}
#endregion

#region Methods
public static void WriteLog(Constants.LogLevel logLevel, String log)
{
switch (logLevel)
{
case Constants.LogLevel.DEBUG:
default:
logger.Debug(log);
break;
case Constants.LogLevel.ERROR:
logger.Error(log);
break;
case Constants.LogLevel.FATAL:
logger.Fatal(log);
break;
case Constants.LogLevel.INFO:
logger.Info(log);
break;
case Constants.LogLevel.WARN:
logger.Warn(log);
break;
}
}

public static string GenerateLogInfo(Exception ex)
{
StringBuilder sbBody = new StringBuilder();
string sURL = HttpContext.Current.Request.Url.ToString();
if (sURL.IndexOf("error.aspx") < 0)
{
string Stack = "";
StackTrace Trace = new StackTrace();
int FrameCount = Trace.FrameCount;
// We skip frame 1 on the stack since that is always the current method //
for (int index = 1; index < FrameCount; index++)
{
if (index > 1)
{
Stack += " --> ";
}
Stack += Trace.GetFrame(index).GetMethod().ToString();
}
Stack = (Stack != "" ? Stack : ex.StackTrace);
Stack = (ex.InnerException != null ? ex.InnerException.StackTrace + "\n" : "") + Stack;
if (Stack == "")
{
Stack = "Stack trace not available.";
}
string exceptionMessage = ex.InnerException != null ? ex.InnerException.Message : ex.Message;
sbBody.Append("<br><table border='1'><tr><td>Time: " + System.DateTime.Now.ToString() + "</tr></td>");
sbBody.Append("<tr><td>URL: " + HttpContext.Current.Request.Url + "</tr></td>");
sbBody.Append("<tr><td>User IP: " + HttpContext.Current.Request.UserHostAddress + "</tr></td>");
sbBody.Append("<tr><td>Error Message: " + exceptionMessage + "</tr></td>");
sbBody.Append("<tr><td>Stack: \n" + Stack.Replace(" ", " ") + "</tr></td></table>");
}
return sbBody.ToString();
}
#endregion
}
}


5) Smtp appender wrapper – Use this class if required

using System;
using System.Collections.Generic;
using System.Linq;
using System.Web;
using log4net.Appender;
using System.Net;
using System.Net.Mail;

namespace StoreManager.Utilities
{
/// <summary>Sends an HTML email when logging event occurs</summary>
public class EmailService : SmtpAppender
{
/// <summary>Sends an email message</summary>
protected override void SendEmail(string body)
{
SmtpClient smtpClient = new SmtpClient();
MailMessage mailMessage = new MailMessage();
mailMessage.From = new MailAddress(From);
mailMessage.To.Add(To);
mailMessage.Subject = Subject;
mailMessage.Body = body;
mailMessage.Priority = Priority;
mailMessage.IsBodyHtml = true;

smtpClient.Host = SmtpHost;
smtpClient.Send(mailMessage);
}
}

}


6) Add below code in Global.asax.cs for global error handling.

protected void Application_Error(object sender, EventArgs e)
{
Exception exception = Server.GetLastError();
HttpException httpException = exception as HttpException;
Response.Clear();

if (httpException != null)
{
Logger.WriteLog(Constants.LogLevel.ERROR, Logger.GenerateLogInfo(exception));
Server.ClearError();
Response.Redirect("~/error.aspx");
}

}

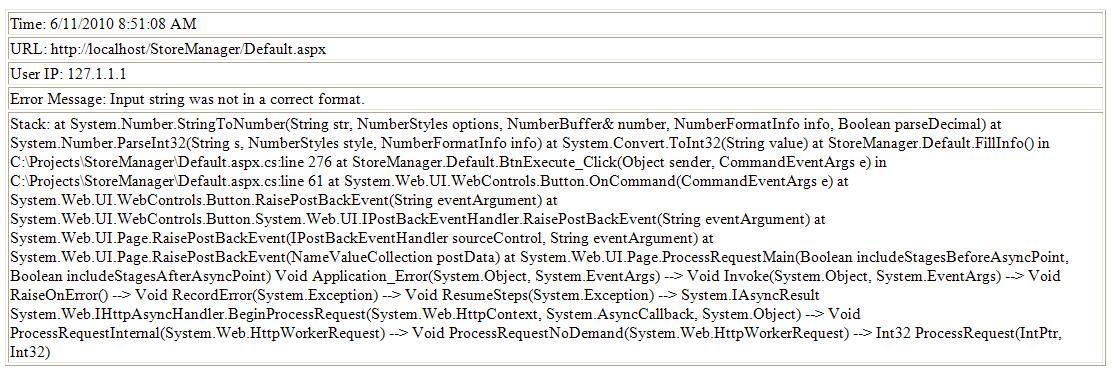
Now we are done with all and this will generate day wise log of errors in html, and also same log will be mailed to listed persons in html format.

This will generate email and log somewhat as below:

Thursday, May 27, 2010

Convert a column with comma saperated row/string in sql

Here we go, to convert a column into row or string separated by a delimiter, we can use coalesce. Just create below function and call it for your SP. Avoid where condition and parameter if not required.

create FUNCTION ConvertColumnToRow (@id int)
RETURNS varchar(100)
AS
BEGIN
DECLARE @List varchar(100)
SELECT @List = COALESCE(@List + ', ', '') + CAST(Name AS varchar(10))
FROM Employee
WHERE ID = @id
RETURN(@list)
END;
go

CSS based lightbox takes seconds to implement

If you want to implement lightbox in short time with less effort and compatible with FF and IE here you go. Copy-paste below html in your page replaces the content and you are done.

<html xmlns="http://www.w3.org/1999/xhtml">
<head>
<title>Untitled Page</title>
<style type="text/css">
.black_overlay{
display: none;
position: fixed;
top: 0%;
left: 0%;
width: 100%;
height: 100%;
background-color: black;
z-index:1001;
-moz-opacity: 0.8;
opacity:.80;
filter: alpha(opacity=80);
}
.white_content {
display: none;
position: absolute;
font-family: Verdana;
top: 25%;
left: 25%;
width: 50%;
height: 50%;
padding: 16px;
border: 16px solid orange;
background-color: white;
z-index:1002;
overflow: auto;
font-size:small;
}
#screenshot {
BORDER-BOTTOM: #ccc 1px solid;
POSITION: absolute;
BORDER-LEFT: #ccc 1px solid;
PADDING-BOTTOM: 5px;
PADDING-LEFT: 5px;
PADDING-RIGHT: 5px;
DISPLAY: none;
BACKGROUND: #333;
COLOR: #fff;
BORDER-TOP: #ccc 1px solid;
BORDER-RIGHT: #ccc 1px solid;
PADDING-TOP: 5px
}
</style>
</head>
<body>
<div>
this is body content

<input type="button" value="Click here to load lightbox" onclick="document.getElementById('light').style.display='block';document.getElementById('fade').style.display='block'" />
</div>
<div id="light" class="white_content">
<a href="javascript:void(0)" onclick="document.getElementById('light').style.display='none';document.getElementById('fade').style.display='none'">
Close</a><br />
<br />
<br />
<div id="container" runat="server">
Put your lightbox content over here
</div>
</div>
<div id="fade" runat="server" class="black_overlay">
</div>
</body>
</html>

This will look something like below:

Global, Generic & Custom JQuery tooltip

Using script and styling generate custom tooltip.

Code:

<html>
<head>
<title>jQuery Tooltip</title>
<style type="text/css">
body { font-family: verdana, arial, sans-serif; font-size: 0.8em; background-color: black; color: white; }
a { color: white; } #example a:hover { text-decoration: none; }
span.show-tooltip-text { display: none; position: absolute; font-size: 0.9em; background-image: url(bg.gif); background-repeat: repeat-x; padding: 6px; padding-left: 12px; padding-right: 12px; color: white; }
</style>
<script language="JavaScript" src="JQuery.js"></script>
<script language="JavaScript">
ShowTooltip = function(e)
{
var text = $(this).next('.show-tooltip-text');
if (text.attr('class') != 'show-tooltip-text')
return false;

text.fadeIn()
.css('top', e.pageY)
.css('left', e.pageX+10);

return false;
}
HideTooltip = function(e)
{
var text = $(this).next('.show-tooltip-text');
if (text.attr('class') != 'show-tooltip-text')
return false;

text.fadeOut();
}

SetupTooltips = function()
{
$('.show-tooltip')
.each(function(){
$(this)
.after($('<span/>')
.attr('class', 'show-tooltip-text')
.html($(this).attr('title')))
.attr('title', '');
})
.hover(ShowTooltip, HideTooltip);
}

$(document).ready(function() {
SetupTooltips();
});
</script>
</head>
<body>
<input type="submit" value="Example Button" class="show-tooltip" title="<strong>HTML</strong> works as normal inside the tooltip.<br/>Multi-line tooltips look and function perfectly fine, as well!"/>
</body>
</html>

This will end up something like below:

User stories and Sprint planning

User Stories are stories that we jot down during discussion with customers / clients. This will give us a brief idea about the requirement. If you are working with the company who deals with internal products then Product owners will become your customer/ clients. Have a look at Description field in below image to find out some of the basic examples of user stories.


Sprint planning is the task to play with all user stories and make them a well order list. Pre-requisition to start sprint planning is to have your whole team with you in the meeting and your product / project owner’s has clear idea of user stories. Once you have rough list of all user stories, scrum master can initiate with making them perfect order list. One has to take one by one all user sorties and have to discuss them with the team to fill all columns in the sprint planning doc.

Normally there are different patterns to design the doc, but you have to pick one standard format. Please refer image for example. Almost all columns in the image are self explanatory still I would like to explain few.

1) Description – User stories
2) Initial estimate – Depending on complexity and time needed you can rank this column in 1 to 13, in which 13 being highest.
3) Adjusted estimate – After planning if you felt that estimates needs to be updated then put re-estimate in this column.
4) Adjustment factor - Adjusted estimate – initial estimate / initial estimate
5) Value – This will be given by product / project owner / clients i.e. High, Medium or Low

To sum up above, points those needs to be consider while creating this doc are estimates, complexity, priority and owner value. If these factors are not enough, one can also consider Uncertainty, dependencies and frequency of use to have more clear idea.

Friday, February 19, 2010

Sprint & Scrum

The Scrum process begins by reviewing a product backlog with the product owner. You identify the highest-priority features and then estimate how many will fit into a sprint. These features then compose the sprint backlog. A sprint is a predefined period of time, usually 2 to 4 weeks, during which the team analyzes, designs, constructs, tests, and documents the selected features.

The team holds a daily status meeting, referred to as the daily Scrum, to review feature status. This meeting has specific guidelines as below:

• The meeting starts sharp on time.

• All are welcome, but only “developers” may speak

• The meeting is “time boxed” to 15 minutes

• The meeting should happen at the same location and same time every day During the meeting, each team member answers three questions:
1. What have you accomplished since our last meeting?
2. What are you planning to do today?
3. Do you have any problems preventing you from accomplishing your goal?
(It is the role of the Scrum Master to facilitate resolution of these impediments. Typically this should occur outside the context of the Daily Scrum so that it may stay under 15 minutes.)

When a sprint is completed, the features are demonstrated to the customer, and the team and the customer decide whether additional work is needed or if the sprint work is approved to be released to a beta or production environment. Each sprint is followed by a retrospective during which the team lists items that went well or poorly;

action plans are documented to keep the successes going and to improve the areas that performed poorly.

Scrum strengths:
Prioritized delivery —Features are delivered in a sequence that ties to business value.
Status transparency —The daily meetings expose the project status.
Team accountability —Everyone signs off on the work that will be pursued during the sprint.
Continuous delivery —Scrum delivers product features (commercial software or web portals) continuously.

Scrum weaknesses:
Scrum doesn’t want specialists. It may be difficult to quickly convert an existing team from a group of specialists to a group where anyone can perform any task.
A Scrum team can’t be successful without a strong ScrumMaster, which makes the process highly dependent on one individual.

Scrum is incredibly popular today—it’s almost become synonymous with the term agile development. Scrum provides a great, repeatable process that is well suited for product development and steady-state release management.

Thursday, February 18, 2010

Agile Principles – 3C 2M2R 2D IST

Customer satisfaction - Our highest priority is to satisfy the customer through early and continuous delivery of valuable software.

Change request - Welcome changing requirements, even late in development. Agile processes harness change for the customer's competitive advantage.

Release cycle - Deliver working software frequently, from a couple of weeks to a couple of months, with a preference to the shorter timescale.

Communication - Business people and developers must work together daily throughout the project.

Resource management - Build projects around motivated individuals. Give them the environment and support they need, and trust them to get the job done.

Discussions/Meetings - The most efficient and effective method of conveying information to and within a development team is face-to-face conversation.

Milestones - Working software is the primary measure of progress.

Maintenance - Agile processes promote sustainable development. The sponsors, developers, and users should be able to maintain a constant pace indefinitely.

Design - Continuous attention to technical excellence and good design enhances agility.

Simplicity - the art of maximizing the amount of work ‘not done is essential’

Teamwork - The best architectures, requirements, and designs emerge from self-organizing teams.

Improvement - At regular intervals, the team reflects on how to become more effective, then tunes and adjusts its behavior accordingly.

Tuesday, December 29, 2009

Generic Handler

Overview

An ASP.NET HTTP handler is the process that runs in response to a request made to an ASP.NET Web application. The most common handler is an ASP.NET page handler that processes .aspx files. When users request an .aspx file, the request is processed by the page through the page handler. You can create your own HTTP handlers that render custom output to the browser.

MSDN Link

For detail understanding of the topic you can use msdn link i.e. http://msdn.microsoft.com/en-us/library/bb398986.aspx

Example

Now let’s take one practical example of generic handler so that we can understand in better way.

Functional requirement – lets say developer wants to push user email address in to some database using client side form post, but before posting the form developer also want to send an email on that email address. To implement this functionality there are few alternate options but lets go with generic handler.

1) Aspx page

<%@ Page Language="C#" AutoEventWireup="true" CodeFile="Default2.aspx.cs" Inherits="Default2" %>
<html>
<head>
<script language="javascript">
function createXMLHttpRequest() {
try { return new XMLHttpRequest(); } catch (e) { }
try { return new ActiveXObject("Msxml2.XMLHTTP"); } catch (e) { }
try { return new ActiveXObject("Microsoft.XMLHTTP"); } catch (e) { }
return null;
}
function SendEmail() {
var xmlHttpReq = createXMLHttpRequest();
xmlHttpReq.open("GET", "Handler.ashx?email=" + document.getElementById('email').value, false);
xmlHttpReq.send(null);
var yourJSString = xmlHttpReq.responseText;
}
</script>
<title>Untitled Page</title>
</head>
<body>
<form action="https://www.xyz.com/" method="post" >

<input id="email" maxlength="100" name="email" size="50" type="text" />

<input type="button" onclick="SendEmail()" value="submit"/>
</form>
</body>
</html>

2) Handler.ashx

<%@ WebHandler Language="C#" Class="Handler" %>

using System;
using System.Web;

public class Handler : IHttpHandler {

public void ProcessRequest(HttpContext context)
{

System.Web.Mail.MailMessage msgMail = new System.Web.Mail.MailMessage();
msgMail.To = context.Request.QueryString["email"].ToString();
msgMail.From = "nishant@zzz.com";
msgMail.Subject = "Hey";
msgMail.BodyFormat = System.Web.Mail.MailFormat.Html;
string strBody = "<html><body>hey ... <br>" +
" <font color=\"red\">how are you..? </font></body></html>";
msgMail.Body = strBody;
System.Web.Mail.SmtpMail.SmtpServer = "yyy.123.abc";
System.Web.Mail.SmtpMail.Send(msgMail);
context.Response.Write("done");
}

public bool IsReusable {
get {
return false;
}
}

}

Above two steps is all about implementing generic handler. In the first step we have just call handler file by passing querystring to it. i.e. “SendEmail()” function in aspx page. In the second step we have added a generic handler by adding new file to the application. Once we added new generic handler file, it will automatically implement ‘IHttpHandler’ interface and will be having empty implementation of ‘ProcessRequest’ and ‘IsReusable’ methods. Now once we call the handler file from javascript it will sent the control to ‘ProcessRequest’ method of the handler class. And as we can see in above example we are suppose to write our cutome logic in ‘ProcessRequest’ method.

That’s all isn’t it easy to implement handler and not only its easy way, it has only one event unlike the page so it is faster then page level request execution, and thus it also improves the performacne :)

Friday, November 27, 2009

XSLT handbook / Cheat-sheet

Howdy,

This time I came up with an XSLT handbook. Being a developer if you ever come cross to XSLT development this blog can help you. As over here I have added all most all kwon topics using which you can start programming in XSLT. Though I have in brief about each topic to know in detail you can click on name of the topic an you will be redirect to the w3school site which i have used to write this blog. hope you all will enjoy this handbook while working with XSLT :)


1) Xsl:stylesheet/xsl:transform - The root element that declares the document to be an XSL style sheet is <xsl:stylesheet> or <xsl:transform>. <xsl:stylesheet> and <xsl:transform> are completely synonymous and either can be used!

2) Href - To provide link or reference syntax would be <?xml-stylesheet type="text/xsl" href="cdcatalog.xsl"?>

3) Xsl:template - An XSL style sheet consists of one or more set of rules that are called templates. A template contains rules to apply when a specified node is matched. <xsl:template match="/">

4) Xsl:value-of - The <xsl:value-of> element is used to extract the value of a selected node. Example - <td><xsl:value-of select="catalog/cd/title" /></td>

5) Xsl:for-each - The <xsl:for-each> element allows you to do looping in XSLT. Legal filter operators are: = (equal), != (not equal), < less than, > greater than. Example - <xsl:for-each select="catalog/cd"> <p><xsl:value-of select="title" /></p> </xsl:for-each>

6) xsl:sort - The <xsl:sort> element is used to sort the output. Example - <xsl:sort select="artist"/>

7) Xsl:if - The <xsl:if> element is used to put a conditional test against the content of the XML file. Example - <xsl:if test="price > 10"> logic.. </xsl:if>

8) Xsl:choose - The <xsl:choose> element is used in conjunction with <xsl:when> and <xsl:otherwise> to express multiple conditional tests <xsl:choose> <xsl:when test="price > 10"> some logic.. </xsl:when> <xsl:when test="price > 9"> some logic </xsl:when> <xsl:otherwise> default logic </xsl:otherwise> </xsl:choose>

9) Xsl:apply-templates - The <xsl:apply-templates> element applies a template to the current element or to the current element's child nodes. If we add a select attribute to the <xsl:apply-templates> element it will process only the child element that matches the value of the attribute. We can use the select attribute to specify in which order the child nodes are to be processed. Syntax - <xsl:apply-templates select="expression" mode="name">

10) xsl:variable - The <xsl:variable> element is used to declare a local or global variable. Syntax - <xsl:variable name="name" select="expression">

11) xsl:call-template - The <xsl:call-template> element calls a named template. Syntax - <xsl:call-template name="templatename">

12) xsl:attribute - The <xsl:attribute> element is used to add attributes to elements. Note that the <xsl:attribute> element replaces existing attributes with equivalent names. Example - <a><xsl:attribute name="href"><xsl:value-of select="RSSLinks/FeedLink"/></xsl:attribute> <img src="images/rss_xml.gif" border="0"/></a>

13) xsl:import - The <xsl:import> element is a top-level element that is used to import the contents of one style sheet into another. An imported style sheet has lower precedence than the importing style sheet. Note that this element must appear as the first child node of <xsl:stylesheet> or <xsl:transform>. syntax - <xsl:import href="URI"/>

14) xsl:apply-imports - The <xsl:apply-imports> element applies a template rule from an imported style sheet. Template rules in imported style sheets have lower precedence than template rules in main style sheets. The <xsl:apply-imports> is used when we want to use a template rule from the imported style sheet rather than an equivalent rule in the main style sheet. Syntax - <xsl:apply-imports/>

15) xsl:attribute-set - The <xsl:attribute-set> element creates a named set of attributes. The attribute-set can be applied as whole to the output document. Note that it Must be child of <xsl:stylesheet> or <xsl:transform>. Example - <xsl:attribute-set name="font"><xsl:attribute name="fname">Arial</xsl:attribute> <xsl:attribute name="size">14px</xsl:attribute><xsl:attribute name="color">red</xsl:attribute> </xsl:attribute-set>

16) xsl:comment - The <xsl:comment> element is used to create a comment node in the result tree. Syntax - <xsl:comment>This is a comment!</xsl:comment>

17) xsl:copy - The <xsl:copy> element creates a copy of the current node. Note that Namespace nodes of the current node are automatically copied as well, but child nodes and attributes of the current node are not automatically copied!

18) xsl:copy-of - The <xsl:copy-of> element creates a copy of the current node. Note that namespace nodes, child nodes, and attributes of the current node are automatically copied as well! This element can be used to insert multiple copies of the same node into different places in the output. Syntax - <xsl:copy-of select="expression"/>

19) xsl:element - The <xsl:element> element is used to create an element node in the output document. Example - <xsl:element name="singer"><xsl:value-of select="artist" /> </xsl:element>

20) xsl:include - The <xsl:include> element is a top-level element that includes the contents of one style sheet into another. An included style sheet has the same precedence as the including style sheet. Note that this element must appear as a child node of <xsl:stylesheet> or <xsl:transform>. Systax - <xsl:include href="URI"/>


21) xsl:key - The <xsl:key> element is a top-level element which declares a named key that can be used in the style sheet with the key() function. Syntax - <xsl:key name="name" match="pattern" use="expression"/>

22) xsl:message - The <xsl:message> element writes a message to the output. This element is primarily used to report errors. This element can contain almost any other XSL element (<xsl:text>, <xsl:value-of>, etc.). The terminate attribute gives you the choice to either quit or continue the processing when an error occurs. Example - <xsl:message terminate="yes"> Error: Artist is an empty string! </xsl:message>

23) xsl:namespace-alias - The <xsl:namespace-alias> element is used to replace a namespace in the style sheet to a different namespace in the output. Note that <xsl:namespace-alias> is a top-level element, and must be a child node of <xsl:stylesheet> or <xsl:transform>.

24) xsl:number - The <xsl:number> element is used to determine the integer position of the current node in the source. It is also used to format a number. Example - <xsl:number value="12" grouping-size="1" grouping-separator="#" format="I"/> Output: X#I#I

25) xsl:output - The <xsl:output> element defines the format of the output document. Note that <xsl:output> is a top-level element, and must appear as a child node of <xsl:stylesheet> or <xsl:transform>.

26) xsl:param - The <xsl:param> element is used to declare a local or global parameter. Note that the parameter is global if it's declared as a top-level element, and local if it's declared within a template. Syntax - <xsl:param name="name" select="expression">

27) xsl:strip-space and xsl:preserve-space - The <xsl:preserve-space> element is used to define the elements for which white space should be preserved. The <xsl:strip-space> element is used to define the elements for which white space should be removed. Note that the preserving white space is the default setting, so using the <xsl:preserve-space> element is only necessary if the <xsl:strip-space> element is used. Note that the <xsl:preserve-space> element and the <xsl:strip-space> element are top-level elements. Example - <xsl:strip-space elements="country company price year" /> <xsl:preserve-space elements="title artist" />

28) xsl:processing-instruction - The <xsl:processing-instruction> element writes a processing instruction to the output. Syntax - <xsl:processing-instruction name="process-name">

29) xsl:text - The <xsl:text> element is used to write literal text to the output. This element may contain literal text, entity references, and #PCDATA. Syntax - <xsl:text disable-output-escaping="yes|no">

30) xsl:with-param - The <xsl:with-param> element defines the value of a parameter to be passed into a template. Note that the value of the name attribute of <xsl:with-param> must match a name in an <xsl:param> element (the <xsl:with-param> element is ignored if there is no match). Also note that the <xsl:with-param> element is allowed within <xsl:apply-templates> and <xsl:call-template>. You can add a value to the parameter by the content of the <xsl:with-param> element OR by the select attribute! Syntax - <xsl:with-param name="name" select="expression">

31) xsl:decimal-format - The <xsl:decimal-format> element defines the characters and symbols to be used when converting numbers into strings, with the format-number() function. All countries do not use the same characters for separating the decimal part from the integer part, and for grouping digits. With the <xsl:decimal-format> element you can change special characters to other symbols. This element is a top level element. The format-number() function can refer to the <xsl:decimal-format> element by name. Example - <xsl:decimal-format name="euro" decimal-separator="," grouping-separator="."/>

32) xsl:fallback - The <xsl:fallback> element specifies an alternate code to run if the XSL processor does not support an XSL element. Syntax - <xsl:fallback> <!-- Content: template --> </xsl:fallback>

33) current() - The current() function returns a node-set that contains only the current node. Usually the current node and the context node are the same. <xsl:value-of select="current()"/> is equal to <xsl:value-of select="."/> However, there is one difference. Look at the following XPath expression: "catalog/cd". This expression selects the <catalog> child nodes of the current node, and then it selects the <cd> child nodes of the <catalog> nodes. This means that on each step of evaluation, the "." has a different meaning. The following line: <xsl:apply-templates select="//cd[@title=current()/@ref]"/> will process all cd elements that have a title attribute with value equal to the value of the current node's ref attribute. This is different from <xsl:apply-templates select="//cd[@title=./@ref]"/> that will process all cd elements that have a title attribute and a ref attribute with the same value.

34) document() - The document() function is used to access nodes in an external XML document. The external XML document must be valid and parsable. One way to use this function is to look up data in an external document. For example we want to find the Celsius value from a Fahrenheit value and we refer to a document that contains some pre-computed results: <xsl:value-of select="document('celsius.xml')/celsius/result[@value=$value]"/>

35) format-number() - The format-number() function is used to convert a number into a string. Syntax - string format-number(number,format,[decimalformat])

36) generate-id() - The generate-id() function returns a string value that uniquely identifies a specified node. If the node-set specified is empty, an empty string is returned. If you omit the node-set parameter, it defaults to the current node. Example - <a href="#{generate-id(artist)}">

37) key() - The key() function returns a node-set from the document, using the index specified by an <xsl:key> element.

Thursday, November 12, 2009

Creating and transforming XML using LINQ

XML has achieved tremendous adoption as a basis for formatting data whether in Word files, in configuration files, or in databases; XML seems to be everywhere. Yet, from a development perspective, XML is still hard to work with. If you ask the average software developer to work in XML you will likely hear a heavy sigh. The API choices for working with XML seem to be either aged and verbose such as DOM or XML specific such as XQuery or XSLT which require motivation, study, and time to master. LINQ to XML, a component of the LINQ project, aims to address this issue. LINQ to XML is a modernized in-memory XML programming API designed to take advantage of the latest .NET Framework language innovations. It provides both DOM and XQuery/XPath like functionality in a consistent programming experience across the different LINQ-enabled data access technologies.

In this article I will explore some of the features available in .NET Framework release 3.5 related to LINQ for XML. This is, of course, not an extensive discussion, merely a familiarization and stepping stone for more learning and exploration.

Let’s start with one of the old ways of creating the xml. Then later on I will explain how the same can be written using new LINQ to XML API.

Old WAY of doing things

public void CreateEmployeesOld()
{
XmlElement root = m_doc.CreateElement("employees");
root.AppendChild(AddEmployee(1, "John doe", DateTime.Parse("12/12/2005"), true));
root.AppendChild(AddEmployee(2, "Kim", DateTime.Parse("11/23/1999"), true));
root.AppendChild(AddEmployee(3, "Carla", DateTime.Parse("2/6/2008"), false));
root.AppendChild(AddEmployee(4, "Aleks", DateTime.Parse("10/6/1998"), false));
m_doc.AppendChild(root);
Response.Write(m_doc.OuterXml);
}

private static XmlElement AddEmployee(int ID, string name, DateTime hireDate, bool isSalaried)
{
XmlElement employee = m_doc.CreateElement("employee");
XmlElement nameElement = m_doc.CreateElement("name");
nameElement.InnerText = name;
XmlElement hireDateElement = m_doc.CreateElement("hire_date");
hireDateElement.InnerText = hireDate.ToShortDateString();
employee.SetAttribute("id", ID.ToString());
employee.SetAttribute("salaried", isSalaried.ToString());
employee.AppendChild(nameElement);
employee.AppendChild(hireDateElement);
return employee;
}

Now say for, once you have created the employee xml and now you want to transform it to new set of xml elements, then old way need help of XSLT. But in below example of LINQ to XML I have explained that too. How easy it would be to transform one xml to another one without using XSLT

New WAY of doing things

public void CreateEmployeesNew()
{
// creating employee xml
XDocument doc = new XDocument(
new XDeclaration("1.0", "utf-8", "yes"),
new XComment("A sample xml file"),
new XElement("employees",
new XElement("employee",
new XAttribute("id", 1),
new XAttribute("salaried", "true"),
new XElement("name", "John doe"),
new XElement("hire_date", "12/12/2005")),
new XElement("employee",
new XAttribute("id", 2),
new XAttribute("salaried", "true"),
new XElement("name", "Kim"),
new XElement("hire_date", "11/23/1999")),
new XElement("employee",
new XAttribute("id", 3),
new XAttribute("salaried", "false"),
new XElement("name", "Carla"),
new XElement("hire_date", "2/6/2008")),
new XElement("employee",
new XAttribute("id", 4),
new XAttribute("salaried", "false"),
new XElement("name", "Aleks"),
new XElement("hire_date", "10/6/1998"))
)
);
Response.Write("
" + doc + "
");

// transforming employee xml in to newer xml format.
XElement element = new XElement("salaried_employees", from e in doc.Descendants("employee")
where e.Attribute("salaried").Value == "true"
select new XElement("employee",
new XElement(e.Element("name"))));
Response.Write("
" + element + "
");
}

To conclude this I would say, XML is fantastic construct that has been deeply ingrained into just about everything. Having the ability to easily construct, query, transform and manipulate XML documents is an invaluable service that will improve the speed of which applications can be built and the quality of those applications.This article is not an exhaustive investigation of LINQ to XML; there have been many other articles, snippets and blogs written on the subject. It mainly just a taste and familiarization of what is possible using .NET 3.5.

Saturday, October 31, 2009

LINQ kick start with basic samples

Hi guys,

For some developers LINQ is still new, as they still working on 2.0. So for those who are bingers to the LINQ, I would like to share few stuff. Although whatever I am writing over here is available in the msdn, I will try to present that all in some different flavor.

Mostly in this article I have covered small but helpful features provided with LINQ.
Generally, using LINQ we are supposed to play with three type of collection. i.e.

  • LINQ: Language Integrated Query for in memory objects (LINQ to Objects)
  • DLINQ: Language Integrated Query for databases (LINQ to ADO NET)
  • XLINQ: Language Integrated Query for XML (LINQ to XML)
Over here for showing examples, I have used only object collection. So everyone can try out these samples within few minutes.

1) So, let’s start with simplest example of LINQ.
int[] numbers = { 4, 5, 3, 1, 9, 8, 6, 7, 2, 0 };
// other operators that can be used are &&, ==,> etc…
var firstFive = from n in numbers where n < 5 select n; //This will filter the collection and if you print firstFive then it would show 4, 3, 1, 2, 0.

2) We can even use two collection to filter the objects for e.g.
string[] digits = { "zero", "one", "two", "three", "four", "five", "six", "seven", "eight", "nine" };
var lowNums = from n in numbers where n < 5 select digits[n]; // This will filter the collection and if you print lowNums then it would show four, three, one, two, zero.

3) We can also perform some arithmetic operation. For e.g.
If we want to add 1 in all digit of numbers collection before we use it to render. We can do that using + sign. i.e.
var numsPlusOne = from n in numbers select n + 1; // As a result if we print numsPlusOne collection it would print like 5, 6, 4 and so on. Similarly we can use other arithmetic signs -, * and /

4) It is also possible with LINQ to use ToLower and ToUpper for e.g.
string[] words = { "aPPLE", "BlUeBeRrY", "cHeRry" };
var LowerWords = from w in words select w.ToLower(); // As a result if we print LowerWords it would print like apple, blueberry, cherry.

5) Taking particular items or skipping them would be easy with LINQ for e.g.
var first3Numbers = numbers.Take(3); //will print 4, 5, 3
var allButFirst7Numbers = numbers.Skip(7); //will print 7, 2, 0

6) Even taking particular items with condition or skipping them would be possible with LINQ for e.g.
var firstNumbersLessThan6 = numbers.TakeWhile(n => n < 6); //will result as first four digit 4, 5, 3, 1.
var firstNumbersLessThan6 = numbers.SkipWhile(n => n < 6); //will result as last six digit 9, 8, 6, 7, 2, 0.

7) We can also use orderby with LINQ for e.g
string[] words = { "cherry", "apple", "blueberry" };
var sortedWords = from w in words orderby w select w; //this will result as apple, blueberry, cherry.

8) We can also reverse the collection using LINQ for e.g
var firstFiveReverse = (from n in numbers where n < 5 select n).Reverse(); //will result as 0, 2, 1, 3, 4.

9) It is also possible to use distinct or group by with LINQ for e.g.
int[] Factors = { 2, 2, 3, 5, 5 };
var uniqueFactors = Factors.Distinct(); will print 2, 3, 5.

10) We can use union, intersect and except with LINQ for e.g.
int[] numbersA = { 0, 2, 4, 5, 6, 8, 9 };
int[] numbersB = { 1, 3, 5, 7, 8 };
var uniqueNumbers = numbersA.Union(numbersB); // this will print all unique numbers from both the collection.
IEnumerable aOnlyNumbers = numbersA.Except(numbersB);// this will print all numberA’s digit except numbersB’s digit.
var commonNumbers = numbersA.Intersect(numbersB); //this will print common numbers of both the collection.

11) The conversion of collection object to list, array or dictionary is possible using LINQ for e.g.
string[] words = { "cherry", "apple", "blueberry" };
var sortedWords = from w in words orderby w select w;
var wordList = sortedWords.ToList(); // here we have converted string array to list.

12) You can even find out particular type of item from the object collection for e.g.
object[] numbers = { null, 1.0, "two", 3, 4.0f, 5, "six", 7.0 };
var doubles = numbers.OfType(); //will print 1.0, 7.0

13) One can search first element or element at any particular position.
int firstNumOrDefault = numbers.First(); //will print 4.
int fourthLowNum = (from n in numbers where n < 5 select n).ElementAt(3); //will print 1.

14) We can use count, min, max, sum, average, aggregate with LINQ.
var uniqueFactorsCount = Factors.Distinct().Count(); //will print 3.
Same way of Count() we can use any of the above function.

15) We can also use concat functionality with LINQ.
var allNumbers = numbersA.Concat(numbersB); //this will print 0, 2, 4, 5, 6, 8, 9, 1, 3, 5, 7, 8.

I feel once we understand the capability and usage of LINQ then we will start implementing it in our day to day programming. So this is just an effort to give some basic idea about what we can do with LINQ. I feel this is at least enough to start with.

Friday, September 18, 2009

Refreshing page after some specific interval

If you have requirement such as you want to refresh your page after every few seconds or minutes, you are reading right blog. I found it very easy to implement. Please go through below example and you will get the exact idea.

Server side code

protected void Page_Load(object sender, EventArgs e)
{
Response.AddHeader("refresh", "5");
}

Client side code

<html>
<head>

<script language="javascript" type="text/javascript">
function fn()
{
var currentTime = new Date()
var hours = currentTime.getHours()
var minutes = currentTime.getMinutes()
var seconds = currentTime.getSeconds()
if (minutes < 10){
minutes = "0" + minutes
}
if (seconds < 10){
seconds = "0" + seconds
}
document.getElementById("div1").innerHTML = hours + ":" + minutes + ":" + seconds
}
</script>

</head>
<body onload="fn();">
<div>
<div id="div1" />
</div>
</body>
</html>

In the above example I have implemented client side watch, which refreshes every five seconds. The only line of code required to write to submit the page is Response.AddHeader("refresh", "5");, other is just custom logic.

happy coding... :)

Monday, September 14, 2009

Relative path issue with client tags ( ~ is not working )

You can continue using a client tag such as <img>, <link>, etc. with the "~" tilde with below solution.


You just need to use the System.Web.VirtualPathUtility.ToAbsolute("~") method to convert the ~ to the Application Path.


So, if your file is located at "~/images/default.jpg" and you need to specify this path in a client tag like <img>, ASP.NET would not allow you to use this path unless you use a Server Control like <asp:Image>.


To continue using the client tag you can use:
<img src="<%=System.Web.VirtualPathUtility.ToAbsolute("~")%>/images/ default.jpg" />


This would be resolved to "/MyApplication/images/default.jpg" where the first forward slash (/) stands for the WebSite root. Thus, the tilde "~" is effectively resolved to "/MyApplication"


Alternatively, Control.ResolveClientUrl can be used. For example,


<img src='<%= ResolveClientUrl("~/images/default.jpg")%>' />

Friday, July 10, 2009

Client Callback sample

This post is a simple example related to client callback functionality, which lets reader to understand how to implement client callback functionality in their application.

///////////////
ASPX
///////////////
<%@ Page Language="C#" AutoEventWireup="true" CodeFile="Client_Callback.aspx.cs" Inherits="Client_Callback" %>

<!DOCTYPE html PUBLIC "-//W3C//DTD XHTML
1.1//EN" "http://www.w3.org/TR/xhtml11/DTD/xhtml11.dtd">

<html xmlns="http://www.w3.org/1999/xhtml" >
<head id="Head1" runat="server">
<script type="text/javascript">
function LookUpStock()
{
var lb = document.forms[0].ListBox1;
var product = lb.options[lb.selectedIndex].text
CallServer(product, "");

}


function ReceiveServerData(rValue)
{
Results.innerText = rValue;
}
</script>
</head>
<body>
<form id="form1" runat="server">
<div>
<asp:ListBox ID="ListBox1" Runat="server"></asp:ListBox>
<br />
<br />
<button onclick="LookUpStock()">Look Up Stock</button>
<br />
<br />
Items in stock: <span ID="Results"></span>
<br />
</div>
</form>
</body>
</html>


////////////////
ASPX.CS
////////////////


using System;
using System.Data;
using System.Configuration;
using System.Collections;
using System.Web;
using System.Web.Security;
using System.Web.UI;
using System.Web.UI.WebControls;
using System.Web.UI.WebControls.WebParts;
using System.Web.UI.HtmlControls;

public partial class Client_Callback : System.Web.UI.Page,
System.Web.UI.ICallbackEventHandler
{
String returnValue = string.Empty;
protected System.Collections.Specialized.ListDictionary catalog;
protected void Page_Load(object sender, EventArgs e)
{
String cbReference =
Page.ClientScript.GetCallbackEventReference(this,
"arg", "ReceiveServerData", "context");
String callbackScript;
callbackScript = "function CallServer(arg, context)" +
"{ " + cbReference + "} ;";
Page.ClientScript.RegisterClientScriptBlock(this.GetType(),
"CallServer", callbackScript, true);

catalog = new System.Collections.Specialized.ListDictionary();
catalog.Add("monitor", 12);
catalog.Add("laptop", 10);
catalog.Add("keyboard", 23);
catalog.Add("mouse", 17);
ListBox1.DataSource = catalog;
ListBox1.DataTextField = "key";
ListBox1.DataBind();
}
public void RaiseCallbackEvent(String eventArgument)
{
if (catalog[eventArgument] == null)
{
returnValue = "-1";
}
else
{
returnValue = catalog[eventArgument].ToString();
}
}
public string GetCallbackResult()
{
return returnValue;
}
}

Generic class which helps in dynamic sql script executing

This post is a sample class, which lets the user to execute their query at run time.

using System;
using System.IO;
using System.Data;
using System.Data.SqlClient;
using System.Data.SqlTypes;
using System.Web;
using Microsoft.VisualBasic;

///
/// Summary description for Class1
///

public class DBProcess
{

#region "Private Members"

private string connectionString = string.Empty;
private string objectQualifier = string.Empty;
private string databaseOwner = string.Empty;

#endregion

public DBProcess()
{
}

public string ConnectionString
{
get { return connectionString; }
set { connectionString = value; }
}

public string ObjectQualifier
{
get { return objectQualifier; }
set { objectQualifier = value; }
}

public string DatabaseOwner
{
get { return databaseOwner; }
set { databaseOwner = value; }
}


#region ExecuteADOScript Method (first overload).
private DataSet ExecuteADOScript(string SQL) //void
{
SqlConnection connection = null;
SqlCommand command = null;
SqlDataAdapter objsqlda = null;
DataSet objds = null;
try
{
//Get the connection
connection = new SqlConnection(ConnectionString);
command = new SqlCommand(SQL, connection);
command.CommandTimeout = 0;
command.CommandType = CommandType.Text;
command.CommandText = SQL;
connection.Open();
objsqlda = new SqlDataAdapter();
objds = new DataSet();
objsqlda.SelectCommand = command;
objsqlda.Fill(objds);

}
finally
{
connection.Close();
command = null;
objsqlda = null;
}

return objds;
}
#endregion

#region ExecuteADOScript Method (second overload).
private DataSet ExecuteADOScript(SqlTransaction trans, string SQL)
{
SqlConnection connection = null;
SqlCommand command = null;
SqlDataAdapter objsqlda = null;
DataSet objds = null;
try
{
//Get the connection
connection = trans.Connection;
command = new SqlCommand(SQL, trans.Connection);
command.Transaction = trans;
command.CommandType = CommandType.Text;
command.CommandText = SQL;
connection.Open();
objsqlda = new SqlDataAdapter();
objds = new DataSet();
objsqlda.SelectCommand = command;
objsqlda.Fill(objds);
}
finally
{
connection.Close();
command = null;
objsqlda = null;
}

return objds;
}
#endregion

#region ExecuteScript Method(first overload).
public DataSet ExecuteScript(string Script, bool UseTransactions)//string
{
string SQL = "";
string Exceptions = "";
string Delimiter = "G" + ControlChars.CrLf;
char[] char2 = Delimiter.ToCharArray();
string[] arrSQL = Script.Split(char2);//, , CompareMethod.Text);

DataSet ds = null;

if (objectQualifier != "" && (!objectQualifier.EndsWith("_")))
{
objectQualifier += "_";
}

if (databaseOwner != "" && (!databaseOwner.EndsWith(".")))
{
databaseOwner += ".";
}

if (UseTransactions)
{
SqlConnection Conn = new SqlConnection(ConnectionString);
Conn.Open();
try
{
SqlTransaction Trans = Conn.BeginTransaction();
bool IgnoreErrors;

foreach (string SQL1 in arrSQL)
{
if (SQL.Trim() != "")
{
// script dynamic substitution
SQL = SQL1.Replace("{databaseOwner}", DatabaseOwner);
SQL = SQL1.Replace("{objectQualifier}", ObjectQualifier);

IgnoreErrors = false;
if (SQL.Trim().StartsWith("{IgnoreError}"))
{
IgnoreErrors = true;
SQL = SQL1.Replace("{IgnoreError}", "");
}

try
{
ds = ExecuteADOScript(Trans, SQL);
}
catch (SqlException objException)
{
if (!IgnoreErrors)
{
Exceptions += objException.ToString() + Microsoft.VisualBasic.Constants.vbCrLf + Microsoft.VisualBasic.Constants.vbCrLf + SQL + Microsoft.VisualBasic.Constants.vbCrLf + Microsoft.VisualBasic.Constants.vbCrLf;
}
}

}
}


if (Exceptions.Length == 0)
{
//No exceptions so go ahead and commit
Trans.Commit();
}
else
{
//Found exceptions, so rollback db
Trans.Rollback();
Exceptions += "SQL Execution failed. Database rolled back" + Microsoft.VisualBasic.Constants.vbCrLf + Microsoft.VisualBasic.Constants.vbCrLf + SQL + Microsoft.VisualBasic.Constants.vbCrLf + Microsoft.VisualBasic.Constants.vbCrLf;
}
}
finally
{
Conn.Close();
}
}
else
{
foreach (string SQL1 in arrSQL)
{
if (SQL1.Trim() != "")
{
//script dynamic substitution
SQL = SQL1.Replace("{databaseOwner}", DatabaseOwner);
SQL = SQL.Replace("{objectQualifier}", ObjectQualifier);
try
{
ds = ExecuteADOScript(SQL);
}
catch (SqlException objException)
{
Exceptions += objException.ToString() + Microsoft.VisualBasic.Constants.vbCrLf + Microsoft.VisualBasic.Constants.vbCrLf + SQL + Microsoft.VisualBasic.Constants.vbCrLf + Microsoft.VisualBasic.Constants.vbCrLf;
throw;
}
}
}
}


return ds;
}
#endregion


}// END CLASS DEFINITION

//////////////////////////////
Calling Client
/////////////////////////////

protected void btnGenerate_Click(object sender, EventArgs e)
{
DBProcess objDbProcess = new DBProcess();

objDbProcess.ConnectionString = txtconn.Text;
objDbProcess.DatabaseOwner = txtowner.Text;
objDbProcess.ObjectQualifier = txtoq.Text;
//txtScript.Text = objDbProcess.ExecuteScript(txtScript.Text, false);
try
{

grdresult.DataSource = objDbProcess.ExecuteScript(txtScript.Text, false);
grdresult.DataBind();
}
catch(Exception ex)
{
txtScript.Text = ex.Message;
}
}


Sometime it is require that you want execute some query on client's server but you cannot access live server every now and then. So having this type of class in your web application with a proper UI would a great help.

Sqlserver 2005 : xquery : Basic function

Below are some of the xquery functions that you can plug in your sql script, which has some xml parsing to do. These are just simple examples but using these concepts, one can solve bigger issues


-- generating dynamic xml
declare @Emp xml
declare @TempVar table
(Code int, FirstName nvarchar(50))
insert into @TempVar values(1,'Nishant')
insert into @TempVar values(2,'Kavita')
set @Emp = (select * from @TempVar for xml path('Employee'), root('Employees'), type)


-- use of 'query' function in xquery is to fetch perticular element of list of elements from existing xml.
declare @EmpNames xml
set @EmpNames = @Emp.query('//Employees/Employee/FirstName')
select @EmpNames for xml path('EmpNames'), type


-- use of 'nodes' and 'value' function in xquery is to get values of perticular nodes from existing xml.
declare @EmpName nvarchar(10)
select @EmpName = emp.ref.value('./FirstName[1]','nvarchar(50)')
from @Emp.nodes('//Employees/Employee') emp(ref)
where emp.ref.value('./Code[1]','nvarchar(5)') = 2
select @EmpName


-- what we have done using 'value' function can also be done with 'query' but for that we need to use 'data' function in cunjuction with 'query'.
set @EmpName = cast(@Emp.query('data(//Employees/Employee/FirstName)[2]') as nvarchar(50))
select @EmpName


-- user of 'modify' function in xquery is to insert, delete or replace elements.


-- inserting xml element
set @Emp.modify('insert Khandhadia into (//Employees/Employee)[1]')
select @Emp


-- deleting xml element
set @Emp.modify('delete (//Employees/Employee/Code)')
select @Emp


-- replacing xml element, it also has use of text() function and also let us know about how to use sql variable inside xquery.
declare @NewName nvarchar(50)
set @NewName = 'nish'
set @Emp.modify('replace value of (//Employees/Employee/FirstName/text())[1] with sql:variable("@NewName") ')
select @Emp

Reflection sample

reflection sample

using System;
using System.Reflection;

/////
///// Summary description for ReflectionExample
/////

public class ReflectionExample
{
public ReflectionExample()
{
//
// TODO: Add constructor logic here
//
}

public void MyMain()
{
// getting type
////////////////////////////////////////////////
// Loads an assembly using its file name.
Assembly a = Assembly.Load("MyRefExampleDLL");
// Gets the type names from the assembly.
Type[] types2 = a.GetTypes();
foreach (Type t in types2)
{
Console.WriteLine(t.FullName);
}
////////////////////////////////////////////////

// getting ConstructorInfo
/////////////////////////////////////////////////

Type type1 = typeof(System.String);
Console.WriteLine("Listing all the public constructors of the {0} type", type1);
// Constructors.
ConstructorInfo[] ci = type1.GetConstructors(BindingFlags.Public | BindingFlags.Instance);
Console.WriteLine("//Constructors");
PrintMembers(ci);


////////////////////////////////////////////////

//uses MemberInfo to list the number of members
//in the System.IO.File class and uses the System.Type.IsPublic
//property to determine the visibility of the class.
/////////////////////////////////////////////////


Console.WriteLine ("\nReflection.MemberInfo");
// Gets the Type and MemberInfo.
Type MyType =Type.GetType("System.IO.File");
MemberInfo[] Mymemberinfoarray = MyType.GetMembers();
// Gets and displays the DeclaringType method.
Console.WriteLine("\nThere are {0} members in {1}.",
Mymemberinfoarray.Length, MyType.FullName);
Console.WriteLine("{0}.", MyType.FullName);
if (MyType.IsPublic)
{
Console.WriteLine("{0} is public.", MyType.FullName);
}


/////////////////////////////////////////////////

//The following example investigates the type of the specified member.
//It performs reflection on a member of the MemberInfo class, and lists its type.
/////////////////////////////////////////////////
Console.WriteLine("Reflection.MethodInfo");
// Gets and displays the Type.
Type MyType1 = Type.GetType("System.Reflection.FieldInfo");
// Specifies the member for which you want type information.
MethodInfo Mymethodinfo = MyType1.GetMethod("GetValue");
Console.WriteLine(MyType1.FullName + "." + Mymethodinfo.Name);
// Gets and displays the MemberType property.
MemberTypes Mymembertypes = Mymethodinfo.MemberType;
if (MemberTypes.Constructor == Mymembertypes) {
Console.WriteLine("MemberType is of type All");
}
else if (MemberTypes.Custom == Mymembertypes) {
Console.WriteLine("MemberType is of type Custom");
}
else if (MemberTypes.Event == Mymembertypes) {
Console.WriteLine("MemberType is of type Event");
}
else if (MemberTypes.Field == Mymembertypes) {
Console.WriteLine("MemberType is of type Field");
}
else if (MemberTypes.Method == Mymembertypes) {
Console.WriteLine("MemberType is of type Method");
}
else if (MemberTypes.Property == Mymembertypes) {
Console.WriteLine("MemberType is of type Property");
}
else if (MemberTypes.TypeInfo == Mymembertypes) {
Console.WriteLine("MemberType is of type TypeInfo");
}
//return 0;


/////////////////////////////////////////////////

//uses all the Reflection *Info classes along with BindingFlags to list all the members
//(constructors, fields, properties, events, and methods) of the specified class, dividing
//the members into static and instance categories
////////////////////////////////////////////////

// Specifies the class.
Type type2 = typeof (System.IO.BufferedStream);
Console.WriteLine("Listing all the members (public and non public) of the {0} type", type2);

// Lists static fields first.
FieldInfo[] fi = type2.GetFields(BindingFlags.Static |
BindingFlags.NonPublic | BindingFlags.Public);
Console.WriteLine ("// Static Fields");
PrintMembers (fi);

// Static properties.
PropertyInfo[] pi = type2.GetProperties(BindingFlags.Static |
BindingFlags.NonPublic | BindingFlags.Public);
Console.WriteLine ("// Static Properties");
PrintMembers (pi);

// Static events.
EventInfo[] ei = type2.GetEvents(BindingFlags.Static |
BindingFlags.NonPublic | BindingFlags.Public);
Console.WriteLine ("// Static Events");
PrintMembers (ei);

// Static methods.
MethodInfo[] mi = type2.GetMethods(BindingFlags.Static |
BindingFlags.NonPublic | BindingFlags.Public);
Console.WriteLine ("// Static Methods");
PrintMembers (mi);

// Constructors.
ConstructorInfo[] consi = type2.GetConstructors(BindingFlags.Instance |
BindingFlags.NonPublic | BindingFlags.Public);
Console.WriteLine ("// Constructors");
PrintMembers(consi);

// Instance fields.
fi = type2.GetFields(BindingFlags.Instance | BindingFlags.NonPublic |
BindingFlags.Public);
Console.WriteLine ("// Instance Fields");
PrintMembers (fi);

// Instance properites.
pi = type2.GetProperties(BindingFlags.Instance | BindingFlags.NonPublic |
BindingFlags.Public);
Console.WriteLine ("// Instance Properties");
PrintMembers (pi);

// Instance events.
ei = type2.GetEvents(BindingFlags.Instance | BindingFlags.NonPublic |
BindingFlags.Public);
Console.WriteLine ("// Instance Events");
PrintMembers (ei);

// Instance methods.
mi = type2.GetMethods(BindingFlags.Instance | BindingFlags.NonPublic
| BindingFlags.Public);
Console.WriteLine ("// Instance Methods");
PrintMembers (mi);

Console.WriteLine ("\r\nPress ENTER to exit.");
Console.Read();


////////////////////////////////////////////////
}

public static void PrintMembers(MemberInfo[] ms)
{
foreach (MemberInfo m in ms)
{
Console.WriteLine("{0}{1}", " ", m);
}
Console.WriteLine();
}
}

MyRefExampleDLL code

using System;
using System.Data;
using System.Configuration;


public enum Days { Saturday, Sunday, Monday, Tuesday, Wednesday, Thursday, Friday };

public struct Book
{
public string title;
public int author ;
};

///
/// Summary description for MySimpleClass
///

public class MySimpleClass
{
public MySimpleClass()
{
//
// TODO: Add constructor logic here
//
}

public string[] Days = {"Saturday", "Sunday", "Monday", "Tuesday", "Wednesday", "Thursday", "Friday"};
public string name = "Nishant";

public string MyMethod(string str, int i)
{
return "MyMethod parameters: " + str + " " + i;
}

public string MyMethod(string str, int i, int j)
{
return "MyMethod parameters: " + str + " " + i + " " + j;
}

public static string MyStaticMethod(string str)
{
return "MyMethod parameters: " + str;
}


}